However, new technology is never perfect, and our gadgets sometimes have issues with causes that are unknown to us. If you’re an Apple user, chances are you’ll encounter the Face ID not working problem at some point (I know I have). It’s frustrating because Apple devices are marketed as top-notch products, and even they fail us sometimes.
Multiple reasons can cause your Face ID not to work as it should, so I decided to put this step-by-step guide together after researching how to get my own to work again. By the end of this article, your Face ID will be up and running again, and you’ll be happy with your Apple device once again.
Face ID Not Working?
Here is a list of fixes for the various reasons behind your Face ID not working. I advise trying each one until you find the solution for yourself.
- Restart iPhone
- Update Software
- Make Sure Face ID is Turned On
- Set Up an Alternative Appearance
- Make Sure There Aren’t Other Faces Around You
- Remove Items Covering Your Face
- Check the Lighting
- Make Sure Nothing is Covering the TrueDepth Camera
- Clean the Camera and Sensors on Your iPhone
- Take Off the Screen Protector
- Reset Phone to Factory Settings
Restart iPhone
This method often works wonders for any tech, be it your PC, phone, TV, or whatever. Restarting a device can potentially fix a small glitch in the system that is causing you trouble. The same goes for Face ID and is done as follows:
- Press and hold the side button and either volume button until the “slide to power off” bar appears at the top of the screen.
- Swipe the red and white power icon from left to right. This will power off your iPhone.
- Give it some time. Wait between 30-60 seconds, then press and hold the side button until you see the Apple logo appear on the screen. This means your iPhone is powering up.
- Check if the issue is solved.
Update Software
Updating software should be done regularly to keep your devices running smoothly, and sometimes, Face ID not working boils down to a missing software update.

- Go to Settings > General > Software Update.
- If there is an update available for installation, tap Download & Install. If not, the words “Your software is up to date” will be all you will see here, and you’ll know this is not the issue.
Also Read: Apple Watch Unable to Check for Update: How to fix!
Make Sure Face ID is Turned On
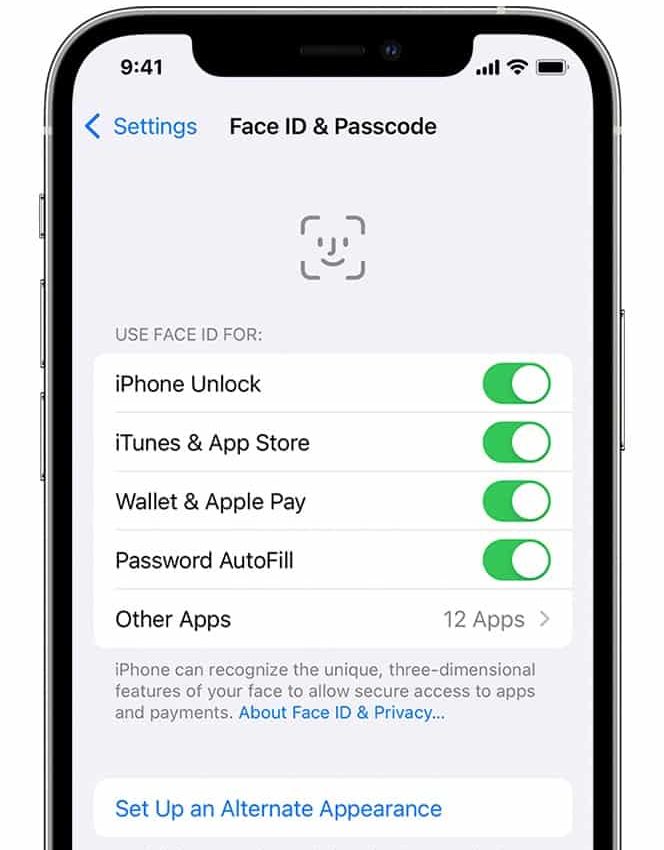
- Go to Settings > Face ID & Passcode.
- Enter your passcode when prompted.
- On the list that appears, check which options are active and which are not. You’ll know the difference by viewing the small sliders on the right side of each available option. Those that are on will be positioned to the right and green, while the inactive ones will be positioned to the left and gray.
- If the option you’re looking to fix is on but not working, turn the option off and then on just to be sure.
Set Up an Alternate Appearance
Though Face ID continuously learns when and how users’ appearances change, sometimes it’s not enough. Setting up an Alternative Appearance might help you fix your issue, so give it a try.

- Go to Settings > Face ID & Passcode. When prompted, enter your passcode.
- Tap Set Up an Alternative Appearance.
- Look straight into your Apple device and position your face within the on-screen frame.
- Gently move your head to complete the circle.
- Once the first Face ID scan is complete, tap Continue.
- Gently move your head to complete the circle for a second time.
- When the Face ID setup is complete, tap on Done.
- Now go back to what you were trying to unlock when you found the issue and try again.
Make Sure There Aren’t Other Faces in the Visible Area

Most modern cameras have some sort of facial recognition tech that helps them focus on faces when taking pictures, crystalizing them instead of other aspects of the image. This means your frontal camera will pick up all the faces it sees when trying to recognize you for Face ID.
Make sure nobody else is in the frame, not even a picture of someone (or you) in the background.
Remove Items Covering Your Face
Apple states that its Face ID can recognize faces with glasses, clothing, makeup, and changing facial hair length. Nevertheless, the iPhone X and 11 were unable to recognize users wearing masks (thanks, COVID-19). Apple also states that some types of sunglasses block the infrared light used by the TruDepth camera.
It could also be a piece of clothing, such as a scarf, cap, or bandana covering your face, or a piece of jewelry, such as piercings, necklaces, and similar blocking recognition. Try using Face ID after removing anything that could be obscuring your face.
Check the Lighting
Apple claims that Face ID works in total darkness, using infrared sensors to map and recognize users’ faces. Around 30,000 infrared beams are projected toward your face to map it accurately, but this is not a foolproof system, and sometimes the lighting is the issue.
My experience is that conditions that are too light or too dark can create difficulties for those infrared sensors, leading to problems during facial recognition. Face ID works best indoors under natural light. If you think the lighting conditions aren’t ideal, move to where they are and try again.
Make Sure Nothing is Covering the TrueDepth Camera

You can usually see if something is covering your TrueDepth camera right off the bat, but I once had some gunk on it that was almost unnoticeable due to its color. When I changed the angle at which I was viewing my device, I saw something there. Remove anything that could be physically covering your camera and clean it.
Clean the Camera and Sensors on Your Device
As I mentioned, gunk and filth can sometimes create problems. Try cleaning your Apple device, especially the cameras and sensors used by Face ID. I recommend using a microfiber cloth to gently wipe it down until it’s spotless.
Also Read: How to Clean Macbook Screen: Top Tips and FAQs
Remove the Screen Protector
It may seem odd, but cases and screen protectors can sometimes interfere with Face ID. If you’re still having issues, try removing everything from your device and trying Face ID again.
Reset Device to Factory Settings
This is when all else fails, and even then, it might not be the solution for you. Remember that this will reset all of your settings, not just the Face ID settings. I suggest making a list of your preferred settings before attempting this option.
- To reset your Apple device’s settings, open Settings and tap General > Transfer or Reset iPhone > Reset > Reset All Settings.
- Enter your passcode when prompted, then tap Reset All Settings when the confirmation pop-up appears on your screen. Once the settings are reset, your device will restart.
Other Troubleshooting Methods
Keep Your Face Away from Your Device
Sometimes things are simple, and fixes are easier than they seem. You could just be holding your device too close to your face, hindering Face ID from positively recognizing you. Apple states, “Face ID works best when the device is arm’s length or less from your face (25–50 cm away from your face)”. So, don’t go burying your face in your device when using Face ID.
Delete Face ID and Set it Up Again
This approach entails deleting your saved biometric data and then setting it up again.
- To delete your current Face ID, open Settings and tap Face ID & Passcode.
- Enter your passcode when prompted, tap on the Face ID you want to delete, and tap Delete Face.
- Go back to Face ID & Passcode and tap Enroll Face. Follow the on-screen instructions to set up a new Face ID.
Factory Reset
Sometimes, wiping your phone clean does the trick, though I advise you to take caution with this method. Make sure you have a backup of all of your contacts and media (pictures, video, music) so you can restore them after resetting your device.
- Go to Settings > General > Transfer or Reset iPhone.
- Tap Erase All Content and Settings.
Once your device has been reset, you can set it up as a new device (not a bad test to see if the issue has been resolved), or you can restore it from a backup. You can also do this via your computer, a method best explained by Apple.
Related Read: How to Factory Reset iPhone: All devices and methods!
DFU Restore your iPhone
A DFU (Device Firmware Update) restore is the final step in finding out whether Face ID not working is a hardware or software issue in your particular case. When you enter DFU mode, every single line of code is erased and reloaded to your device, leaving you with an out-of-the-box device, at least in terms of software.
Make sure to backup your device before attempting this method, as you will lose everything if you don’t.
- Connect your device to your computer and turn off any antivirus software as it will interrupt the DFU connection.
- Press and release the volume up button.
- Press and release the volume down button.
- Press and hold the side button until the screen goes black, and don’t stop holding it down. Once the screen goes black, you need to press and hold the volume down button for 5 seconds while still holding the side button.
- After 5 seconds, release the side button while holding the volume down button.
- As soon as your device appears in iTunes or Finder, you’ll know you are in DFU mode.

If the Apple logo appeared on your screen, you held the volume down button too long. You’ll need to start over if that’s the case. Steps may differ depending on what generation of iPhone or iPad you have. If this method doesn’t work for you, visit Apple support to find the correct procedure for your device.
- A pop-up will appear informing you that your computer has detected a device in recovery mode and that you must restore this device before it can be used. Click on OK.

- When the pop-up disappears, click on Restore iPhone/iPad (depending on your device).

When restoring is complete, and the welcome screen appears on your device, there are two different ways to restore your backup depending on where you backed it up. If you have an iCloud backup, unplug your device from your computer and continue the process on your phone. If you have an iTunes backup, keep it plugged in and follow the instructions on your computer.
If this method doesn’t fix your Face ID issue, you’ll know you’ve ruled out every possible software issue, and the only remaining reason is hardware-related.
Also Read: Firmware vs Software vs Hardware
AppleCare
If none of the above worked for you, you need to have your device repaired by a professional. If your device is still under warranty, bring it to your local Apple Store, and they’ll do the rest. Unfortunately, most Apple devices only come with a one-year limited warranty and 90-days of complimentary tech support. You can extend this by purchasing AppleCare+.
As of 2022, Apple has begun sending out parts of the TrueDepth camera, including the front-facing camera and Face ID, to authorized service providers, allowing repairs without whole-unit replacements. This option is not available in every country yet, but if you’re in the US, you’ll be fine.
Frequently Asked Questions
Can iPhone Face ID be repaired?
Yes, Face ID can be repaired. If the issue is a software-related glitch, follow the steps in this article. If it is a visual problem, that can also be ruled out by following the instructions in this article. If you have ruled out all of the above, your device can be repaired by an authorized Apple repair service. Contact your local store for more information on repairs.
Conclusion
I hope you found this article helpful. I’ve had issues with my Face ID not working and had to try several methods before solving the problem. Grouping them in a single article seemed the smartest thing to do.
We’d love to hear your feedback and to hear if there is any other method I failed to cover here. Nevertheless, remember this methodology for any issues you have with any device. Ruling out one solution after another is the best way to solve a problem.