Lenovo Active Pen is a stylus made for select Lenovo laptop models. It enables users to draw and take notes like a regular stylus with a slew of additional features and enhanced levels of pressure sensitivity.
For the new buyers wondering how to use the Lenovo Active Pen, you first need to pair the pen. Click on the Start button, then choose Settings > Devices > Bluetooth & other devices. Now, press and hold the top button on the active pen and wait until the LED indicator starts flashing white light. After that, choose the pen from available Bluetooth devices on your device and select “Pair.”
How to Use Lenovo Active Pen Functions
You can use different buttons on the Lenovo Active pen to completely use the stylus to draw and paint, take notes, and do more creative work. To learn how to use Lenovo Active pen properly, you first need to understand different Pen Button Functions.
The default Pen Button Functions are as follows. However, you can customize them to match your requirements. The Top button is located at the end of the pen. Barrel buttons are the two buttons on the side.
Default Pen Button Functions
- Tap the screen while holding the top barrel button: Right-click
- In supported apps, hold the bottom barrel button to delete the object: Erase.
- Top button (for Pens with top buttons only once they’ve been paired with a desktop): In supported apps, hold the bottom barrel button to delete the object: Erase.
- With Single Click: Open the Windows Ink Workspace dashboard.
- If you double click, you will get the following results: Take a screenshot and send it to OneNote.
You can use the Lenovo Pen with supported apps on the PC after the Lenovo Pen and PC are connected. By tapping the top button of the pen, you can instantly access various functions.
How to Customize Lenovo Active Pen Button Functions
You can also modify the default settings for the Pen or the button functions by installing Lenovo Pen Settings App or Wacom Pen App on your desktop.
The top button function for pens featuring the top button only can be customized with Windows 10 Settings Pen & Windows Ink or Lenovo Pen Settings App. We suggest using the dedicated pen app by Lenovo to customize the button functions. You can make custom edits to the functions of barrel buttons in the Lenovo Settings App or Wacom Pen App.
You can choose customization such as which dominant hand (left or right) you want to use and customize the Pen’s input effects, shortcut buttons, and compatible App controls.
How to Customize Pen Button Functions With Lenovo Settings App
On your desktop, you need to install the Lenovo Pen Settings App. The app lets you customize Pens buttons, pressure, and tilt sensitivity.
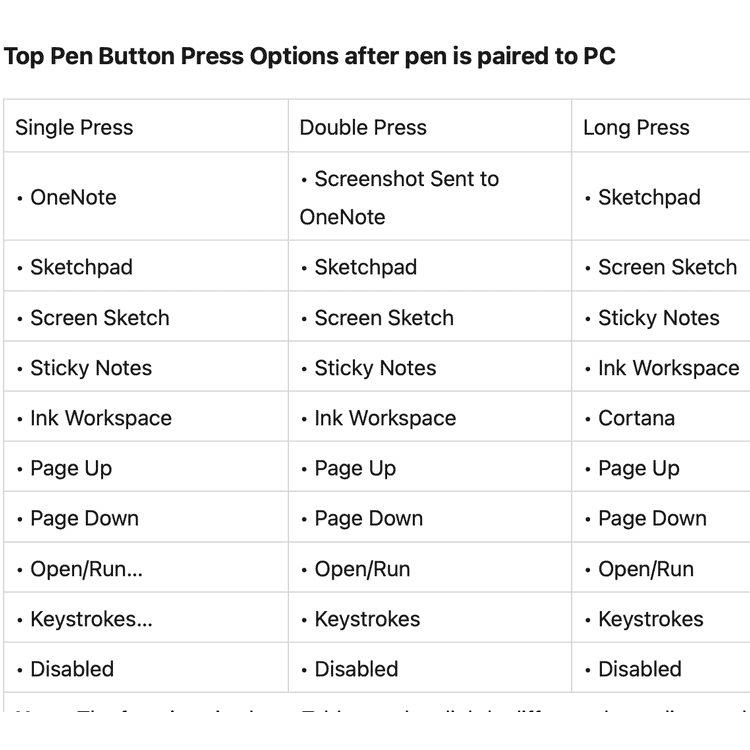
You can customize the top barrel buttons and change the course of action to different apps that you want to access instantly. Here are the Pen Button Press options you get after successfully pairing the Active Pen with your desktop.
For example, you can customize the single click to open apps like OneNote, Sketchpad, Sticky Notes, and more. Likewise, double click on the button can be customized to trigger functions like sending screenshots to OneNote or opening apps like Sketchpad, Screen Sketch, and more.
Similarly, long-pressing the top barrel button can open Cortana on your Windows running desktop, keystrokes, and more.

Note: Depending on the App version and Pen design, the functionalities from the above table may differ.
How to Customize Pen Button Functions With Wacom Pen App
Lenovo Active Pens are also compatible with Wacom Pen App as they use Wacom’s pen technology. This means that you can alternatively download Wacom Pen App to tweak the button functions on your Pen.
You can customize your Pen’s top button, top barrel button, and bottom barrel button in the Wacom Pen App. The app works in the same way as the Lenovo Settings app. You get to assign the same functions to different buttons, as shown in the table under Lenovo Settings App.
You can configure every button with different functions under Click once, Double-click, Press & hold from the drop-down list to pick one of the functions. You can assign each function to actions like opening Windows Ink Workspace, Snip & Sketch, and other tools.
Presentation Mode in Lenovo Active Pen
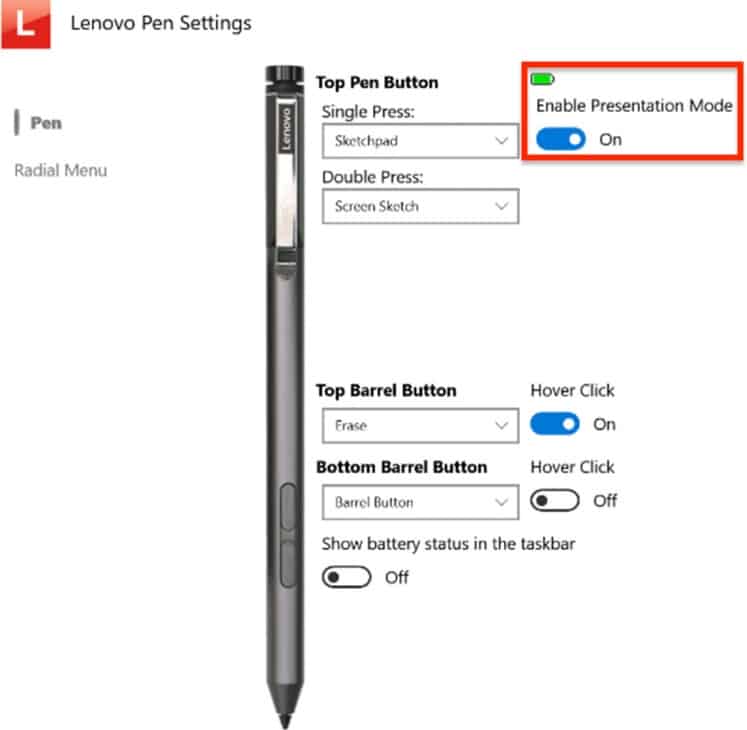
In the Lenovo Pen Settings app, there’s an option called “Enable Presentation Mode.” This function comes in super handy during presentations, as it triggers your Lenovo Active Pen to automatically control the slides or pages with single and double clicks.

For example, the page goes down with a single click on the Pen, while a double click gets the page up. To use this feature, make sure that it is enabled in the app.
Hover Mode in Lenovo Active Pen
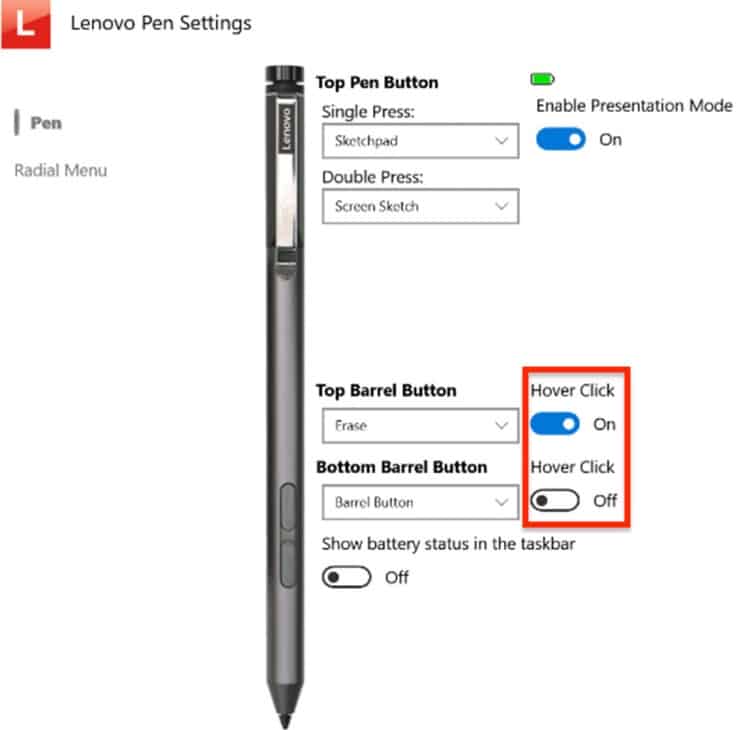
Like Presentation mode, you will find the “hover click” option next to the top and bottom barrel button in the Lenovo Settings app.
When Enabled: The Hover Click (when active) executes the button’s function without the need to touch the pen’s tip to the screen. You can single-click, double-click, or long-press the buttons to trigger the functions.
When Disabled: The Hover Click (when not active) limits the button’s functionality when the pen’s tip touches the screen, you need to tap the pen’s tip on your device’s screen to use the buttons and enable the functions.

Radial Menu Settings
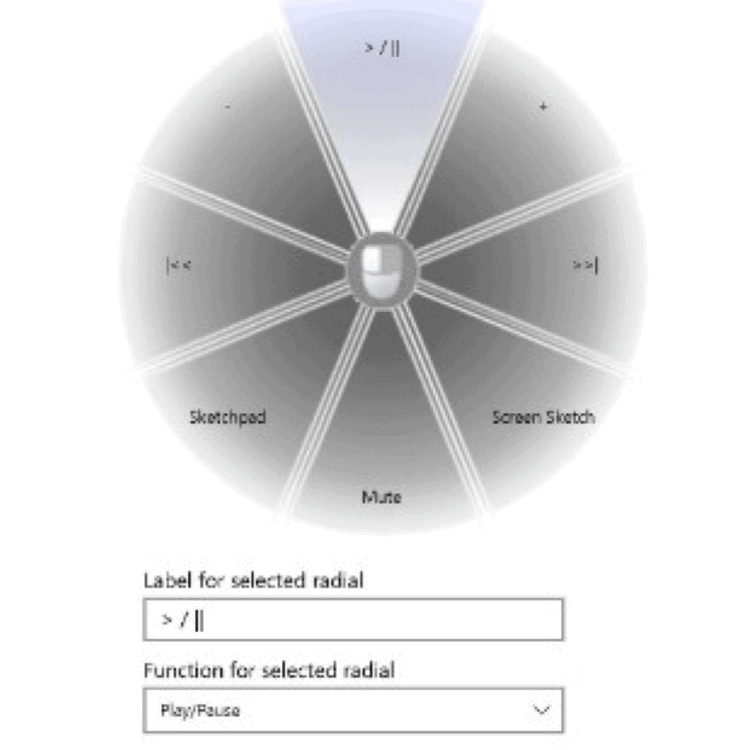
The barrel button on your Lenovo Active Pen triggers the Radial Menu function. By enabling this function, you get a floating pop-up menu on your device’s screen that offers custom functionality with one click and tap.

Under the Radial Menu Settings, you will find the following customizable functions in the pie-shaped Radial Wedges:
- Play/Pause
- Volume Up
- Next Track
- Screen Sketch
- Mute
- Sketchpad
- Previous Track
- Volume Down
Lenovo Active Pen 1 Setup
The Lenovo Active Pen 1 is designed to mimic the feel of a pen and paper on a display. It offers pinpoint precision, palm rejection, and Wacom technology to make your touchscreen-enabled Yoga laptops feel even better. As a result, it features 2048 pressure sensitivity levels. The only shortcoming is the lack of Bluetooth connectivity.
Please note that Lenovo Active Pens are only compatible with screens that support touchscreen functionality. Therefore, if you have a regular screen laptop, this pen will not work on it.
Step 1. Assemble the Pen
Lenovo includes a battery with the package, which you must insert before activating the pen. It is simple to fix an opener from the pen’s upper section. Next, use the USB port to connect to your laptop since it keeps the pen closer and helps in overall connectivity.
Step 2. Download and Install the Lenovo Pen Settings App (or Wacom Pen App)
Installing the Lenovo Pen Settings App or Wacom Pen App is important to customize the button functions. Go to the Microsoft Store on your laptop and search for the app. Download and install the app.
Step 3. Customizing Barrel Buttons
Your Lenovo Active Pen features two side buttons called Top barrel button and the Bottom barrel button.
- Top barrel button: Press and hold this button and then tap the screen to trigger Right-click functionality. This is the default function.
- Bottom barrel button: Press and hold this button and then tap the screen to trigger the erase functionality on select apps. This is the default function.
You can customize these buttons for different functions. Just open the Lenovo Pen Settings App and start customizing button functions, pressure sensitivity, presentation mode, showing battery status, and more. Once you are done customizing, you will be able to use the Lenovo Active Pen 1 on your device.
Step 4. Replacing Battery and Tip
Lenovo offers an extra battery and tip with the stylus. Keep them safe and use them when your existing battery or tip starts to give up. You will need to change the battery when the LED indicator on your pen starts flashing during usage.
Lenovo Active Pen 2 Setup
The successor to the Lenovo Active Pen 1 is called Lenovo Active Pen 2. Unlike its predecessor, the Active Pen 2 comes with Bluetooth connectivity, enhanced pressure sensitivity backed by 4096 pressure sensitivity levels, and more. Although it has significantly improved over the first-gen, the setup process remains somewhat the same.
Step 1. Assemble the Pen
You’ll find a USB holder, a pencil battery, and two coin batteries when you unbox the pen. As a result, before connecting with a laptop, you must assemble the pen. The whole assembling part is a bit complex. Please watch the video below to add a battery and fix the pen.
Step 2. Download and Install the Lenovo Pen Settings App (or Wacom Pen App)
After setting up the pen, head to Microsoft store on your laptop and install Lenovo Settings App. Alternatively, you can also install the Wacom Pen app.
Step 3. Customizing Barrel Buttons
The Lenovo Active Pen 2 has just one top and one bottom barrel button. You can use the Lenovo Settings App to customize these buttons with desired functions.
Step 4. Replacing Battery and Tip
The Lenovo Settings App tells you about the condition of your battery. You can use the extra battery that you got with the stylus to replace it. Similarly, you can use the replacement tips when your existing one starts to depreciate.
Conclusion
Lenovo Active Pens work great for creative tasks like drawing, painting, photo editing, and more. They bring the functionality of a stylus to laptops. If you plan to buy a Lenovo Active Pen, make sure that your PC or laptop is compatible with it.
We hope our guide about how to use Lenovo Active Pen helps you set up and use the pen effectively. Let us know in the comments!