Is it possible to use a Wii remote to control a Nintendo Switch? The short answer is… yes! But it won’t be easy and it’s not recommended due to compatibility issues. You’ll need a few adapters before your Wiimote can communicate with your Switch.
How to use Wii Controller on Switch?
- The first thing you’ll need is a USB Type-C Hub. You may already have one, but a lot of people don’t. You’ll need this kind of hub, which is compatible with the Nintendo Switch. Your Nintendo Switch’s docking station already has some USB inputs, but you’ll probably be using them for other outputs such as a monitor.
- Next, you’ll need to connect a Bluetooth dongle (Bluetooth USB adaptor) to the USB hub. But you can’t just connect any Bluetooth dongle. You’ll need an 8BitDo Bluetooth USB Adaptor. It allows your Switch to communicate to the Wii Remote via Bluetooth. With any other dongle, you’ll need a CronusMAX and a Wii U Brook Converter.
- You may also need to get the Nunchuk extension to your Wiimote. This extension adds a few extra inputs to your controller, improving its compatibility with the Switch.
- In addition to that, it’s a good idea to get a Sensor Bar with the Wii remote. It enhances the capabilities of the accelerometer and gyroscope on board the Wiimote.
Here’s a detailed video guide on how to connect your Wiimote to your Nintendo Switch without the 8BitDo dongle:
So do Wii controllers work on Switch? As you can see, while connecting a Wii Remote to your Nintendo Switch certainly is possible, it’s a bit of a pain.
Difference between Wii Remote and Joy-Con
There are too many differences between the Wii Remote and the Joy-Con to ignore them.
Joy-Con
- Accelerometer and gyroscope that do not require a Sensor Bar
- NFC (Near Field Communication)
- Player-facing camera
- HD Rumble
- 1 joystick, 1 trigger, 1 shoulder, 1 option button, 1 function button, 4 face buttons, and 2 shoulder buttons
Wii Remote
- Accelerometer and gyroscope that require a Sensor Bar
- Standard rumble
- IR camera
- D-Pad, 1 trigger, 2 options buttons, 2 function buttons, and 3 face buttons
- With the Nunchuk extension: 2 triggers, 1 joystick
As you can see, even with the Nunchuk extension, the Wii Remote has fewer buttons than the Joy-Con. This mismatch will create compatibility issues. You may find a workaround for this, but it’s not easy to use a Wii controller on Switch.
Two other mismatches stand out here: the accelerometer and the rumble. The accelerometer and gyroscope on the Joy-Con are accurate enough that they do not require a Sensor Bar. Unfortunately, the same does not apply to the Wii Remote.
Aside from that, there is a significant difference in the rumble of the two controllers. While the Wii Remote does have a decent rumble quality, it just pales in comparison to what’s featured on the Joy-Con.
The only benefit the Wii Remote has over the Joy-Con is the built-in speaker. It adds an extra layer of immersion that the Joy-Con lacks. But the cons outweigh the pros here.
How to Connect Your Wii Controller on Switch
Here’s a detailed video tutorial on how to connect a Wii remote with a Switch:
What You’ll Need
- Nintendo Switch
- A Wii remote
- USB Type-C Hub for Nintendo Switch
- 8BitDo Bluetooth USB adapter
Step 1 – Charge the Switch
First things first, make sure the Switch is charged. You don’t want your Switch to power off while you’re syncing it up with the Wii remote. Ideally, the battery should be at least 50% charged before you proceed. You may use any standard charging method to charge your Nintendo Switch.
Step 2 – Plug the USB C Hub
Next, plug in the USB Type-C hub into your Switch. Find the dedicated USB C port on the Switch and then continue with plugging the hub in. Follow the instructions for any necessary setup. The USB hub is what lets you connect USB Type-C devices to your Switch console.
Step 3 – Plug The 8bitdo Dongles
Now, to connect the Switch with the Wi-Fi, you’ll need to plug in the Bluetooth USB adapter from 8BitDo, also known as a dongle. Find the dedicated port and plug the dongle into it. Once it’s set up and ready to go, you’ll see a bright red flashing light.
Once that happens, press the button on the 8BitDo. The dongle will start flashing faster and then stop.
Step 4 – Sync the Wii Remote
Finally, you can now proceed to sync the Wii remote. Much like the Switch, make sure that the remote has working batteries in it. It’s a good idea to test it on other things first. Once you’ve made sure that the remote has enough charge, press the button marked “Sync” at the back.
Step 5 – Testing the Wii Controller Input
Lastly, you want to test the Wii Controller Input to make sure it’s working. First, go to the Home Screen and click on System Settings. Then, find the Controller and Sensor option in the menu and click on it.
From the menu that appears on the right side, click on “Test input Device.” There, you’ll see the “Test Controller Buttons” option. Click on it.
To test the remote, simply press any button on the Wii Remote. Whatever that button is configured to do should appear on the screen. If not, then you’ll need to do some troubleshooting.
If you’re done testing and want to exit this testing phase, simply press any button on your controller.
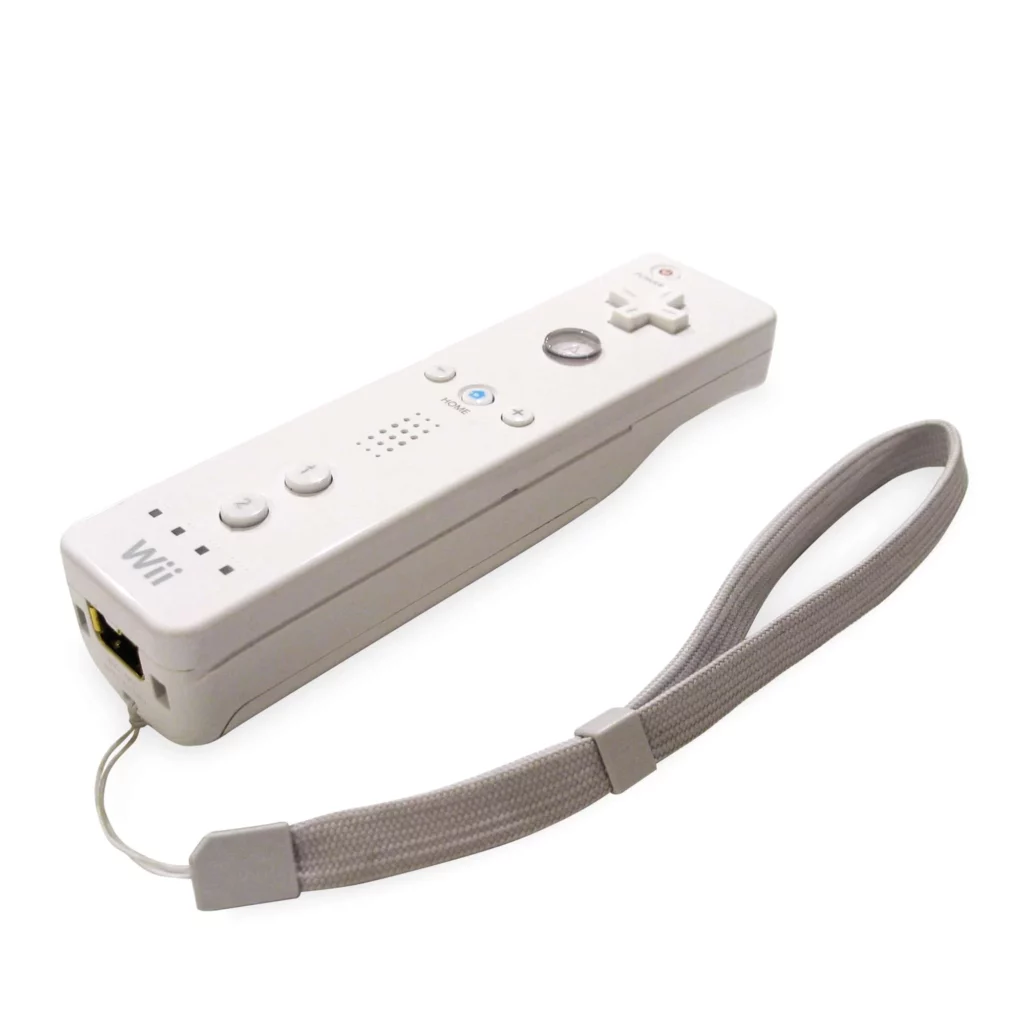
Features of the Wii Remote
There are a lot of unique features that can be used when you connect the Wii Controller on Switch, such as:
Built-in Speaker
Many gaming controllers don’t have speakers. But what makes the Nintendo Switch so unique is the fact that it has a built-in speaker. Think of Legend of Zelda. Imagine you’re shooting a bow from an arrow. The sound of the arrow leaving the bow will zip past you, from the controller to the TV. It creates an additional layer of immersion.
Rumble Functionality
Rumble functionality is the most basic form of controller feedback. If you’re not familiar with it, it refers to the Wii remote vibrating during key events. It uses tiny motors that rumble and generate small vibrations. Rumble functionality adds another layer of immersion to an already immersive experience.
Three Face Buttons
The Wii remote features three face buttons: the D-Pad, the 1 button, and the 2 button.
Wii’s D-Pad works much like any ordinary joystick. Aside from just moving up, down, and sideways, it also has some other functions. For example, you can use it to Reload, Search, Enter URLs, and go to your Favorites.
The 1 and 2 buttons are quite straightforward. The 1 button lets you go to your favorites, while the 2 button converts the screen into a Single Column Mode.
Two Option Buttons
Additionally, you get two option buttons: the minus (-) and the plus buttons (+).
The minus (-) button is a versatile button. It’s mainly used to zoom out, but it can be used to move backward too.
The Plus (+) button is mainly used to zoom in. However, using the trigger button can be used to go forward as well. Similarly, the Plus button also functions as a Start button.
Two Function Buttons
The Wii Remote also features two function buttons: the HOME and Power buttons.
By pressing the HOME button, you’re taken straight to the Wii Home Menu page.
And with the Power button, you can turn the remote ON or OFF.
Single Trigger Button
Finally, there’s the single Trigger button “B” on the side face of the Wii Remote. This shoulder button is your main trigger button. By pressing it, you can change some of the functionality of the other buttons.
Frequently Asked Questions
How do I connect my Wii remote to the Switch?
Connecting the Wii remote to the Switch is tricky. Although both use Bluetooth, the connection is not that simple. You’ll need a Bluetooth USB adaptor such as an 8BitDo to connect the Switch to the Wii remote. Plugin the 8BitDo to the USB port on the Switch. Then, once you see the 8BitDo flashing, press the button on it.
Conclusion
In short, using a Wii controller on Switch is possible but not recommended. You’ll need to buy a USB Type-C hub as well as an 8BitDo dongle. And even with that, the mismatch of buttons and lack of HD Rumble only make your gaming a lot more hectic.
If you still have any questions feel free to comment below.
To summarize, it’s not recommended to use a Wii remote with a Nintendo Switch. But it is possible with an 8BitDo dongle.