Plugged the home base in? Check. Completely charged? Check. Set a cleaning schedule? Check. Your Roomba vacuum cleaner is ready to go out in the world.
Until… *beep* — Error 14 is displayed on your Roomba. But no need to panic; we have written this guide to assist you with handling Error 14 on Roomba.
Read on to find the cause of this error, the best troubleshooting steps to resolve it, and more. By the end of the guide, you will be able to use your Roomba like before!
Roomba Error 14 Meaning
Error 14 on Roomba occurs due to many reasons. But usually, it means that the Roomba is not detecting an installed bin. To resolve this error, clean the dust bin and filter. Error 14 can also happen due to software bugs. It’s important to conduct regular cleaning of your Roomba vacuum cleaner.

What Does Error 14 on Roomba Mean?
Error 14 usually refers to a problem with the robot vacuum being incapable of detecting whether a bin is installed. Either the owner has not installed the bin correctly, or the device has failed to seat the bin properly. The same error shows up as 1-4 in some models.
Also, Error 14 displays when the vacuum can’t detect an accurately installed dust bin. This can happen due to different reasons. If the user has installed the bin incorrectly, the same error will be shown.
Moreover, the inability to detect the bin can be due to accumulated dust and grime in the sensors if you haven’t cleaned your Roomba in a long time.
Check the filters, bin, and sensors of the device regularly to determine if it’s clean. Other causes can be a low battery or corrupted software.
How to Fix Roomba Error 14
If you have invested in a Roomba vacuum cleaner — say the 600, 700, or 800 series, after being impressed by the automated features, but now it’s showing you Error 14, don’t worry.
While we know that the error is linked to the functioning of the bin, this section will talk about something else — practical troubleshooting methods to resolve this issue.
Let’s get into it.
Clean it
Don’t ignore your Roomba. After all, it does all the dirty work for you. The vacuum robot is made of three types of sensors, as mentioned below:
- Full bin sensors
- Floor tracking sensors
- Cliff sensors
Cliff sensors recognize changes in the floor level, such as steps, stairs, and ledges. It makes the device stop or swerve.
Full bin sensors notify you when the dust bin requires cleaning. Lastly, floor tracking sensors acquire the room’s data, such as the furniture and walls.
When we discuss Error 14 on a Roomba, the full bin sensors are important. They can detect an installed dust bin too. After it gets dirty, it won’t function properly. This makes your Roomba incapable of sensing the dust bin.
As we’ve stated above, the accumulation of dust is a major culprit for Error 14 on your Roomba. But by cleaning your vacuum, the detection issue will be fixed. To clean it:
- Flip over the dustbin of the device and unscrew the screws present on the bottom of the bin. These vary from 4 to 6 screws. The dust bin is located where the fan is.
- Disassemble the dust bin section. Clean the debris and dust from the fan. You can either shake the component or use a can of compressed air. However, don’t use anything sticky or pointy. If needed, you can use a Q-tip to clean the dust. Plus, don’t forget to clean the compartment above the fan.
- Now, ensure you clean the vent at the back of the dust bin. Also, remember to clean the vacuum hole.
- Run the fan to see if it is stuck or can rotate freely.
- Finally, organize the unit back again.
Check whether the Error 14 message is now gone. If not, you should clean the contacts of the bin and the motor. You can employ a pencil eraser to clean the contacts.
Another component to observe is the filter. The filter sifts the dust into little particles, after which they enter the dust bin. Some wool, dust, or big objects might accumulate here. From there, they end up in other parts of the vacuum cleaner.
The dust bin captures everything passing through the filter. This is the dirtiest part of your Roomba. Many users are unsure how often they should clean these components.
For the cliff sensors and floor tracking sensors, schedule a monthly cleaning routine. And for the full bin sensors, once every two weeks is fine. If you run your Roomba daily, clean the filter each week.
If hairy pets roam around your house, do it two times a week. Plus, make a habit of replacing the filter every two months.

After each cleaning session, empty the dust bin.

You may wipe it as well. To improve your cleaning, wash the bin with warm water, especially on the sides where the dirt gets stuck.
Reinstall the bin
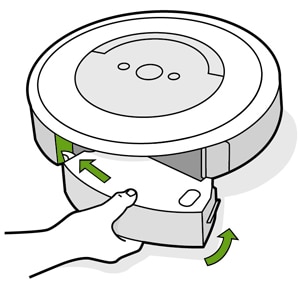
iRobot usually recommends this as it’s the most straightforward troubleshooting step. Simply remove and reinstall the dust bin and guarantee that it’s installed accurately.
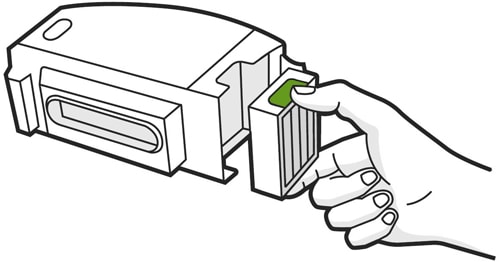
To take out the bin, press the release button. Place it back inside carefully and confirm that it fits properly. Also, observe the bin to see if it’s damaged. If it is, replace it. You can get a new bin from the iRobot store.
After reinstalling the bin, press the Clean button to see if the error persists.
Reinstall the battery
Software bugs are the biggest enemies of your Roomba. The robot vacuum cleaner runs on software. And software can malfunction sometimes, especially if you have been using it for a few years. But not necessarily.
It probably needs a break or a reload. And start all over again with a clean slate. If the software is not working optimally, the other components won’t be able to do their job. This is why Error 14 appears on your device.
To resolve any software bugs, three methods exist:
- Reinstall the battery
- Restart the device
- Reset the device
We will start with the first one and explain the rest in the following sections.
Similar to the bin reinstall, it’s a great idea to reinstall batteries too. This troubleshooting step serves as a soft reset and can eliminate temporary issues. Reinstalling the battery won’t take longer than 5 minutes. To do it:
- Remove the battery of your Roomba vacuum cleaner.
- Ensure that the contacts are not sticking out of the device. If yes, it’s a good idea to slip a piece of tin foil/metal strip over the broken piece to allow contact between the unit and the dust bin.
- The dust bin should be firmly and properly closed. You should press the sides of the dust bin after removing the handle. Another way is to rub both sides of the dust bin with sandpaper, so it fits properly.
Now, flip the vacuum over to the accurate side and watch it work for the cleaning routine. If Error 14 on the Roomba persists, try to replace the malfunctioning components or the entire dust bin to erase the complication.
Reset the batteries
Roomba models boast a neat battery reset function that can recover the battery’s lost charge cycles and resolve temporary complications.
500 and 600 series
To reset the battery in 500 or 600 series:
- Press the Clean button.
- Now, press and hold down the Dock and Spot buttons for 15 seconds.
- Let the buttons go after it beeps.
- Leave the device on the charging dock until the Clean button goes green (approximately takes 10 hours).
That’s it!
700 series
The instructions for the 700 series are:
- Connect the device to the charging cable or charging dock.
- Press the Clean button for ten seconds.
- Let go of the button when a beep is heard.
- Let the Roomba charge for 15 hours.
Again, make the device run the scheduled cleaning to see if the error is resolved.
Restart it
A reboot is a terrific way to fix Error 14 on Roomba, especially if the culprit is a temporary bug in the software. And, of course, the instructions vary depending on the model. We’ve mentioned different guidelines below.
S-series
If you own the S-series, restart it by:
- First, hold down the Clean button for 20 seconds.
- Let it go once the white LED ring around the bin’s lid is spinning clockwise.
- Wait until the Roomba turns back on.
- After the white light turns off, it means the restart was successful.
This is how you can restart an S-series Roomba.
I-series
For the I-series, do the following:
- Again, hold down the Clean button for 20 seconds.
- Let it go once the white light surrounding the buttons is spinning clockwise.
- Wait for the device to turn on.
- After the white light is gone, it means that the restart was successful.
This is how you can restart an I-series Roomba.
700, 800, and 900 series
To restart the 700, 800, and 900 series:
- Hold down the Clean button for ten seconds.
- Let it go once a beep is heard.
- The device will reboot automatically.
After it reboots, check if it still shows the error.
Factory reset
If restarting or cleaning did not work in your case, consider doing a factory reset on the vacuum robot. To do this, ensure that the device is connected to the iRobot Home app on your mobile.
Remember that doing a factory reset will erase all stored and customized information, like your house map and password. You will need to save this information again as the default settings will be brought back.
The instructions for a hard or factory reset are as follows:
- On the iRobot Home app, navigate to the Settings menu.
- Click on Factory Reset.
- Now, confirm the prompt.
- After accepting the prompt, the robot vacuum will initiate its factory reset process. Allow it to complete the reset.
After the factory reset is successfully done and the device starts functioning again, try running a cleaning cycle to see if the error is gone.
To better understand a hard reset, watch the following YouTube tutorial below.
Customer support
If you have tried all the above-mentioned troubleshooting methods and Error 14 on your Roomba is still present, don’t hesitate to contact iRobot customer service. Their staff will offer advanced troubleshooting fixes according to your particular scenario, personalized for your Roomba.
But that’s not all; they can make a better-informed decision on whether you should schedule a visit to their center with your robot.
Related Read: The Best and Funniest Roomba Names
Frequently Asked Questions
Still have more questions buzzing in your mind? That’s perfectly normal because it can be challenging to understand and work your way around Error 14.
Keeping this in mind, we have answered a few commonly asked questions below.
Why does my Roomba keep saying charging error?
Charging error results due to counterfeit batteries. Ensure that the original battery is installed correctly. Remove the battery and check for any obstruction on the battery contacts, like the yellow battery pull tab.
How do I know if my Roomba battery is bad?
Different lights depict the states of the battery. For example, if the power light doesn’t shine, it could mean that the battery has gone bad. Similarly, the solid green indicates a full charge, and a solid red color depicts an empty battery.
How do I fix a charging error?
There are various troubleshooting steps to fix charging errors. Roomba has indicators for up to 8 different types of charging errors, so it’s best to visit iRobot’s website to find appropriate troubleshooting steps for your Roomba model.
Conclusion
Our helpful guide to understanding and resolving Error 14 on your Roomba ends here. We hope your Roomba vacuum cleaner is back on track, getting rid of all the dirt, dust, and grime and diving into the faraway corners of your home again.
Which one of these methods came to your rescue? Tell us in the comments below!